
[Github 에 반영하기 (git commit/push)] 에서 보았듯이 write 권한이 없는 repository 에는 직접 반영을 할 수 없다.
이에 write 권한을 가지고 있는 계정의 review를 받고 해당 계정을 통해 반영이 이루어 져야 한다.
이러한 과정을 Pull Requests 라고 하며 github 의 tab 들 중 하나에서 확인할 수 있다.

Pull Request 를 위한 전반적인 Flow 에 대한 이해
Pull Request 는 fork 된 repository 를 통해 이루어지게 되고, 이를 위한 repository fork / git clone을 포함한 Pull Request 를 올리는 큰 flow 는 다음과 같다.

- Pull Requests를 올리고자 하는 repository를 fork 한다.
- fork한 repository 를 Local PC 에 git clone 한다.
- 수정 commit 을 fork한 repository에 push 한다.
- push한 commit을 원본 repository 에 pull requests 한다.
Pull Request 를 올리는 실제 사례
아래의 예는 원본 Repository (TechNoteCode/Sample) 을 fork 하여 신규 Repository (technotekr/Sample) 을 생성하고, 해당 fork된 repository (technotekr/Sample) 를 통해 수정 내용을 반영 후 원본 Repository (TechNoteCode/Sample) 에 Pull Requests 하는 과정이다.
1) 원본 Repository (TechNoteCode/Sample) 의 왼쪽 상단 "Fork" 버튼을 눌러
fork repository (technotekr/Sample) 생성.

Fork 과정이 시작되면 아래와 같은 화면이 나오면서 진행된다.

이후 Fork가 완료되면 동일 이름을 가진 Fork 된 repository (technotekr/Sample) 이 생성된다.

2) vscode 에 fork 된 repository 를 연동.
상세 과정은 [Github 와 연동하기 (git clone)] 참조
3) 수정 코드를 fork 된 repository 에 반영
상세 과정은 [Github 에 반영하기 (git commit/push)] 참조
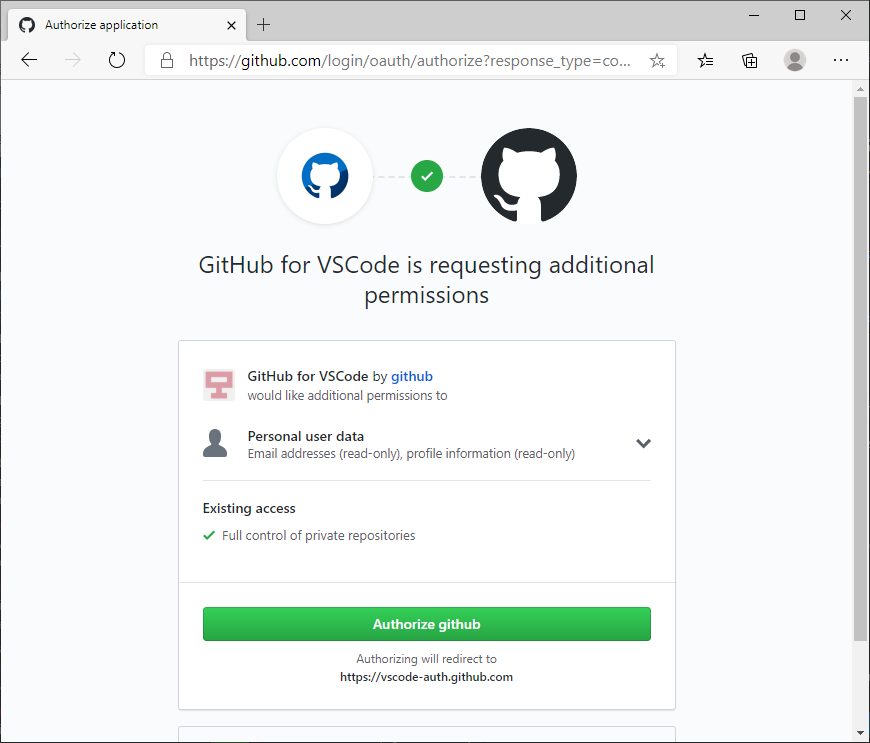
4) vscode에 'GitHub Pull Requests and Issues' extension 설치

Install 을 하게 되면 아래 팝업이 나오고 github pull requests를 위한 로그인 및 권한 설정을 진행하게 된다.


모든 설치 및 설정이 끝나게 되면 아래와 같은 아이콘이 왼쪽 메뉴 리스트에 나타나게 된다.

5) 원본 repository 설정
fork 된 repository 에서 원본 repository 에 pull requests 하기 위해서는 원본 repository를 upstream repository 로 아래와 같이 등록해 주어야 한다.
> git remote add upstream '원본 repository'
PS D:\Github\Sample> git remote -v
origin  https://github.com/technotekr/Sample.git (fetch)
origin  https://github.com/technotekr/Sample.git (push)

PS D:\Github\Sample> git remote add upstream https://github.com/TechNoteCode/Sample.git

PS D:\Github\Sample> git remote -v
origin  https://github.com/technotekr/Sample.git (fetch)
origin  https://github.com/technotekr/Sample.git (push)
upstream        https://github.com/TechNoteCode/Sample.git (fetch)
upstream        https://github.com/TechNoteCode/Sample.git (push)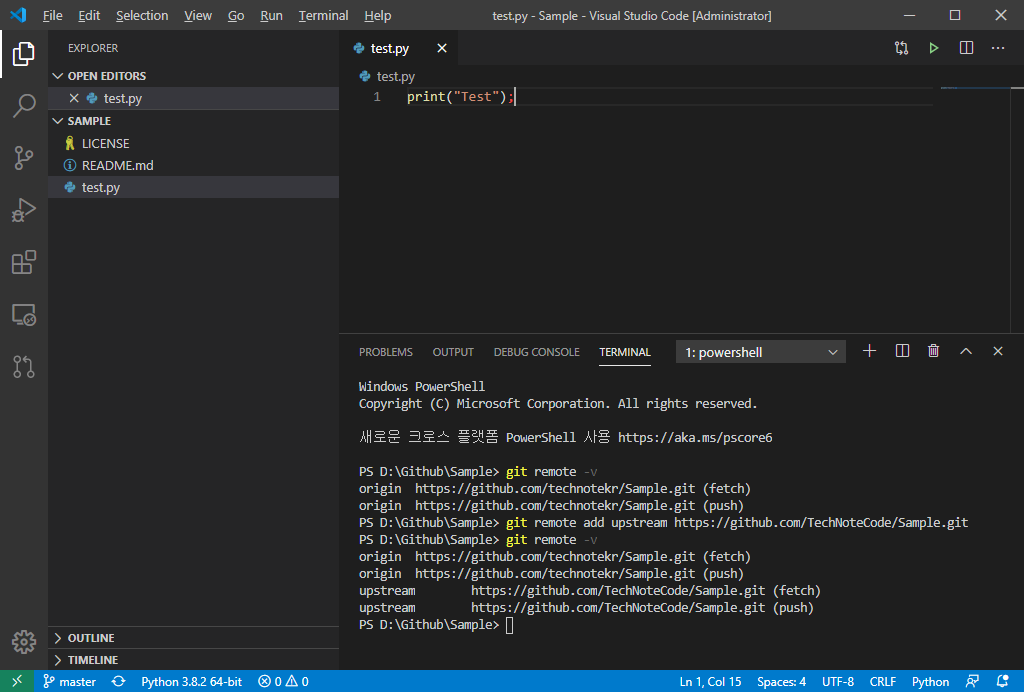
6) Pull Requests 진행
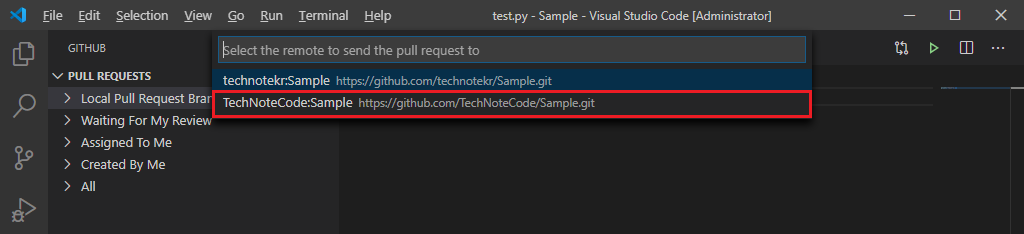
수정 내용을 commit/push 하였고, upstream repository 설정도 되었다면 PULL REQUESTS 옆 ' + ' 버튼을 눌러 pull requests 를 진행할 수 있다.

Pull request를 할 대상인 원본 repository (TechNoteCode:Sample) 을 선택한다.
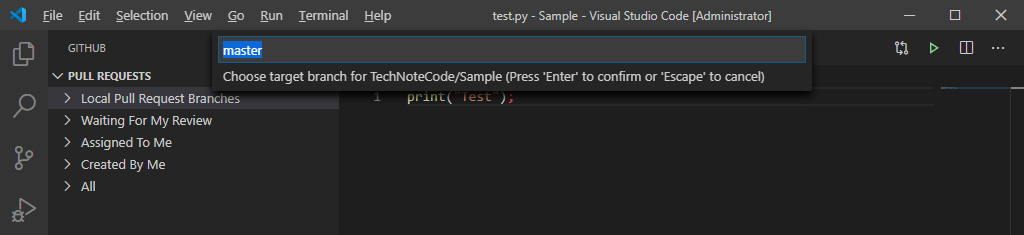
Pull Requests 대상 branch 를 선택한다.
Pull Requests 의 제목으로 사용된 message/name 을 선택한다.

7) Pull Requests 등록 확인
모든 선택을 마치면 아래와 같이 Pull Requests 가 등록됨을 확인할 수 있다.

Web 으로는 아래와 같이 확인할 수 있다.
Pull Requests 를 등록한 계정의 입장에서는 반영을 할 수 없기 때문에 merge 버튼이 보이지 않지만 해당 repository에 write 권한이 있을 경우 수정 내용 리뷰 후에 merge 버튼을 통해 해당 수정 내용을 반영할 수 있다.

다수 개의 Pull Request 를 올리는 방법에 대한 이해
추가 수정의 PR (Pull Request) 등록
이후 추가 수정을 PR 로 올리려면 어떻게 해야 할까.
먼저 step3 과 같이 추가 수정 사항을 만들어 fork 된 origin/master branch 에 push 해보자
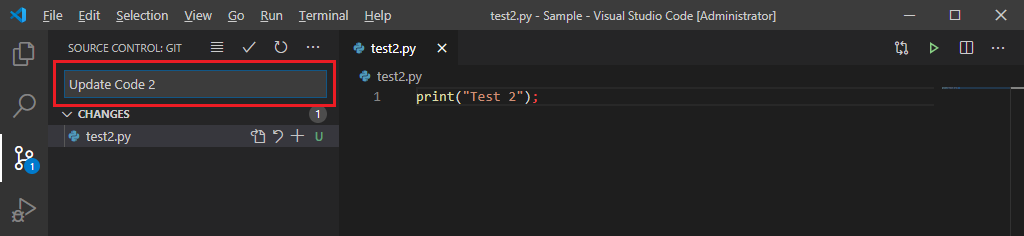
1) 추가 수정 내용 작성

2) Commit 내용 기입하여 git push 까지 진행

3) Pull Request 를 올리려고 하면 아래와 같이 Error 가 발생한다.
Creating pull requests for 'technotekr:master' failed:
Validation Failed: A pull request already exists for technotekr:master

Source: GitHub Pull Requests and Issues (Extension)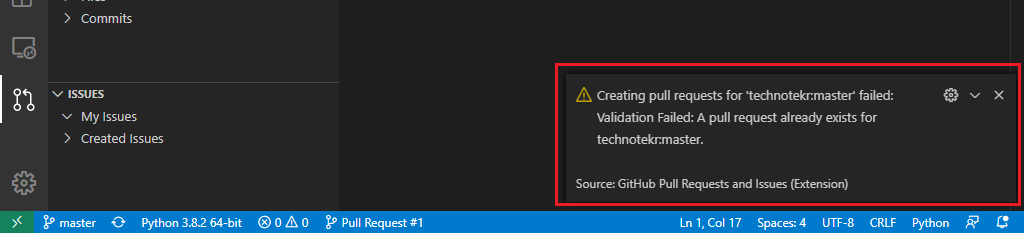
그 이유를 알아보면 다음과 같이 새로운 수정에 대해 새로운 Pull Request가 올라가는게 아니라 현재 존재하는 Pull Request 에 새로운 Commit 으로 추가되어 올라간 것을 볼 수 있다.

새로운 수정 사항에 대해 별도의 Pull Request 를 올리려면 어떻게 해야 할까.
위의 예에서는 기본으로 주어진 master branch 를 가지고 Pull Request의 예를 보여주었지만 Pull Request를 올리기 위해서는 fork 된 repository내에서 Pull Request 별로 별도의 branch를 만들고 Pull Request를 올리는 것으로 이해 하면 된다.
즉, 아래와 같다.
1) fork 된 repository 내에 Pull Request를 작업하기 위한 branch를 생성한다.
2) 해당 branch 에서 수정을 한 후 git push 후 Pull Request 를 올린다.
3) 작업 완료한 branch를 삭제한다.
1) [Ctrl + Shift + `] 를 통해 terminal 을 연 후 아래 명령어로 원하는 commit 으로 부터의 branch를 생성한다.
| Fork된 repository의 HEAD commit 으로 branch를 분기하여 생성할 수도 있겠지만 원본 repository (upstream/master) 의 HEAD 이후 commit 은 모두 같이 Pull Request로 올라가기 때문에 Fork 된 repository의 HEAD가 아닌 원본 repository 의 HEAD commit 으로 분기하는게 일반적이다. |
git checkout -b 'branch 이름' 'commit'
2) 코드 수정 후 원본 repository에 Pull Request 를 올린다.

3) 아래와 같이 이전 Pull Request 와는 분리되어 새로운 Pull Request 가 올라간 것을 확인할 수 있다.


Trouble Shooting
1) Upstream repository 등록이 되어 있지 않을 경우 아래와 같은 에러가 발생할 수 있다.
이와 같은 Error Message 가 발생할 경우 step 5 와 같이 원본 repository 를 upstream repository 로 등록해 주어야 한다.
[Info] Review> Validating state...
[Info] No remote with name 'upstream' found. Please update your 'githubPullRequests.remotes' setting.
[Info] Found GitHub remote
[Info] Review> no matching pull request metadata found for current branch master
[Info] GitHubRepository> Creating pull requests failed: Error: No matching repository Sample found for TechNoteCode
'Products & Services > VS Code' 카테고리의 다른 글
| [VSCODE] Prettier - Code formatter 설정 (0) | 2021.09.26 |
|---|---|
| [VSCODE] Google Python Style Guide 적용 (0) | 2021.09.20 |
| [VSCODE] Project 관리 (Project Manager Extension) (0) | 2021.06.26 |
| [VSCODE] Github 에 반영하기 (git commit/push) (0) | 2020.05.17 |
| [VSCODE] Github 와 연동하기 (git clone) (1) | 2020.05.17 |
| [VSCODE] VS Code 를 이용한 원격(Remote) 코드 개발 (0) | 2019.11.13 |
| [VSCODE] Visual Studio Code, Microsoft의 Open Source (0) | 2016.04.25 |